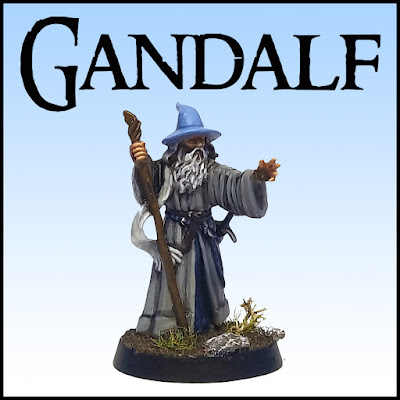
134 - Tutorial: Gandalf the Grey! (Goblintown)
Mae govannen, mellon nín!
Welcome to another tutorial my friends.
And what should follow after our Bilbo Baggins? Well, Gandalf of course, the last member of Thorin's Company!
Like the rest of the Company, this plastic miniature is part of the Escape from Goblintown box set.
Although I've painted already multiple Gandalf's (or should I write Gandalfar??), I always enjoy doing so - it is my favourite Tolkien character.
This miniature ended up with a deficit of smoothness colour-wise, and I can't help to blame the varnishing process in the end. But well, it is finished, and I'm relatively happy with it.
Up until now these are the already painted miniatures from Thorin's Company:
Dwalin | Balin | Thorin Oakenshield | Bilbo Baggins
As if you didn't knew already...
Who is Gandalf?
 |
| Artist: Ian Miller |
How to paint Gandalf the Grey?
II: The hair and beard of Gandalf were basecoat with a light-grey colour;
III: The shading process for the hair and the beard was done with a earth-brown wash;
IV: The first step of the highlighting process aimed at "cleaning" the shaded hair and beard with the same light-grey colour used on step II: I tried to pick the most prominent strands of hair on the miniature.
V: The final step of the highlight process for hair and beard lies on picking up the most prominent strands with a simple white paint;
VI: I basecoat the hat following Tolkien's description of it, so: blue. This light colour was achieved with a mix of white and a mid-toned blue;
VII: I then shaded the hat with a blue wash;
VIII: After the wash, I decided to give the hat a lighter and less saturated highlight, so I mixed a light-grey with the blue tone previously used (from step VI).
Without surprise, Gandalf's robe plays with different shades of grey.
IX: I started by basecoating it with a dark-grey (the paint I used also has a hint of brown);
X: In this step I shaded the robe with a black wash;
XI: For the first step of the highlighting I used the same colour from step IX with the aim of "cleaning" the result of the shading;
XII: The final step of the highlighting process was done with a light-grey paint: focus on the edges and most prominent parts of the robe and try to give the scarf a distinguished look with a lighter grey (you can add a bit of white to the light-grey).
It is now time to focus our attention on the details of the miniature. First of all, I tried to detect the different lines of the scabbard and the belt.
XIII: Gandalf's scabbard, sword-grip and under cloth were carefully basecoated with a mid-blue paint;
XIV: The belt and shoe were carefully basecoated with a dark-brown;
XV: The metallic parts of Glamdring (sword) were basecoated with a bright-silver colour;
XVI: After all the three previous steps, I shaded the basecoated parts with a black wash. Afterwards, I used the exact same colours than before for every part of those shaded details (you can always use a lighter tone for any of them if you want to give the miniature a brighter look).
XVII: Finally, the wood tones of the staff were achieved by basecoating it with a desaturated dark-brown (if you don't have that colour you can add a small hint of blue to your brown);
XVIII: The last step is the highlighting of the staff with a bright mid-toned brown. You can shade it or glaze it with a thinned down brown wash.
After all these steps, the miniature is ready to be varnished and to have its base finished.
Showcase


Comments
Post a Comment